Showing posts with label nature. Show all posts

Monday, September 7, 2015

Book Review: Quilled Borders and Motifs

Quilled Borders & Motifs by Judy Cardinal.  Published by Search Press, 2008.  48 pages.

I rate it ... good!

3.2/5.0

See my post about book reviews for details about my review criteria and biases.

This is a sturdy little (48 page) quilling book that introduces a host of small designs in many themes (i.e. baby, wedding, holiday) for use in a variety of situations (i.e. cards, frames, ornaments).  I do not have a long review for this book - regrettably, as I'll note later, the publisher made a bad decision in reproducing much of the content within another book.

What I liked:
The huge variety of little projects and designs that can be used alone or together to make wall art, greeting cards, frames for invitations and announcements, and so much more.  I think this would be a good book to show to children to get their ideas flowing.

What I liked less:
As noted, the publisher made a bad decision (in my opinion) and included ALL of the motif section inside of another book (Beautiful Quilling Step-By-Step, which I'll review another time.  It has material from several books, in fact.)  This decision by Search Press makes me nervous when looking at any of their books.  I have to ask myself, "Do I already own this in another form?".  The work is reprinted exactly, page for page, materially damaging the usefulness of both books.  It's a shame since it robs each book of originality and usefulness.  Another issue with the book is the uncertain quality of the quilling - for example, the quilled heart within the tutorial on page 14 shows uneven tension (visible in several of the projects in the book, as well.)  The book has few actual patterns for the designs, making more difficult for beginners, and a bit less intuitive, I think.

As a collector of quilling books, I am happy to have it in my collection.  But for the current going price of $10 or so, I'd probably go for the larger Beautiful Quilling book instead of this one, were I choosing between the two.

Monday, August 24, 2015

Book Review: The Book of Paper Quilling

The Book of Paper Quilling - Techniques and Projects for Paper Filigree by Melinda Johnston.  Published by the Sterling Publishing Company, 1994.  144 pages.

I rate it ... excellent!

4.9 / 5.0

See my post about book reviews for details about my review criteria and biases.

Next to the last book I reviewed (Paper Art for Everyone) this is probably my favorite.  Or at least one of my favorites :)  It is one of the first of what I'd consider to be the "modern" breed of quilling books.  I have in my mind this idea that the "traditional" quilling books/kits/patterns were published in the 70's and 80's, and the "modern" quilling books generally in the 90's until today.  And there are other quilling books that I consider sort of "post-modern."  I call these "innovative."  These offer really new looks at techniques and projects (like typography, illustration, cross-cultural, and impressionistic work). 

Anyway, with that in mind, this is an excellent modern quilling book.

The book begins with a brief history of quilling, and then moves into the introductory/tutorial section.  The bulk of the subsequent pages are spent on projects and patterns, followed up by a gallery of wonderful quilled pieces.  Really, this is sort of my ideal outline for a "working" quilling book.

What I like:
First of all, the quality of the quilling the book is invariably high.  All the pieces are uniform, created with even tension and have a nice, even, lacy quality.  There are very small, regular center holes to each of the pieces.  The history section is accompanied by images of period quilling pieces, and the accompanying text includes several references, although more would have been welcome.  The "getting started" section is very well constructed, including showing how different paper widths effect the finished quill.  The "menu" of quilled shapes is comprehensive, and high quality.  Techniques include looping, husking, and weaving.  The bulk of the book, as noted, is filled with interesting patterns, each with detailed instructions.  Patterns include: wall art, wreaths, miniatures, ornaments, eggs, borders, gift tags, cards, magnets, coasters, baskets, jewelry, hats, and an incredible chess board with pieces.  At the end there are even simple motifs for kids to quill.  The gallery includes abstract quill art, as well as impressive, more traditional pieces.

What I like less:
Honestly, just the history section.  It needs a touch more of a scholarly approach with more citations and references for information.  That's it, really.

So if you like quilling, this is a must have, as far as I'm concerned.  And if you don't have it yet, you can get it used for less than $3.  With 144 pages of great quilling, it's a total steal.

Sunday, August 16, 2015

The Quilling Archive - A Gallery of Quilling

Quilling inside of real seashells - made into ornaments.
I've done so much quilling - it's hard to keep track of who I gave it to, and where it is even in my own home.  But I've recently been struck with the idea that I want to document it all, so I've been rounding up quilling projects, old and new, and taking the best pictures I can.  I've been putting up the best of them at my newly created DeviantArt Gallery for quilling.

There is so much stuff - wall art, ornaments, miniatures, jewelry, and more.  You can see the evolution of my quilling through much of it, but since I started at the age of nine, by the time I was in high school I was pretty proficient.  Pieces like these shell ornaments, done when I was about fourteen, show solid technique and an eye for fun.  They even include tiny little pine cones.  I don't think I'd even imagine filling seashells and turning them into ornaments anymore, which is a shame.  :)   I don't even recall where I got the idea in the first place.

They are a bit beat up, with a few pieces missing, and a touch faded.  But not much, considering decades of sunlight, humidity, and moving from place to place.  I'll chalk that up to using a good acrylic sealant, and maybe using a bit too much glue.  I've always used a bit too much glue - one of those technique problems I have ...

How about you?  What was your first quilling project?  How do you preserve your quilling for the ages?

Image Credit - My picture of my own quilling, designed by me.

Saturday, August 15, 2015

Finding Quilling in the World

Quilling design on the cover of a catalog!
I don't like sorting through the mail.  I'm not sure why, but I think it is because my mail generally consists of too many catalogs, the usual bills, and a plethora of general junk mailers.  So imagine my glee when I rifled through the mail and found this!  Quilling in the 'real' world!  (Note I'm not promoting the catalog in question, I'm just thrilled with the quilled cover!)

I absolutely love to see this.  I've been quilling for almost forty years now, and there were long, long stretches where nobody else I knew was doing it.  Nobody even knew what it was, nor had ever seen a single piece of quilling.  It was so out of vogue that I had trouble finding places to buy paper - no one was carrying it, and the companies I used as a kid were all going out of business.  The craft stores stopped carrying supplies.  It was fortunate that I had bought so much paper when I started, because it literally got me through years where I was unable to find any source at all (unless I wanted to make my own, which I was starting to consider).

Then things changed.  It was slow at first, but more companies popped up selling paper and quilling supplies.  More quilling books showed up in the bookstore.  And thank heavens for the internet.  I love the internet.  Suddenly I could find supplies in odd, niche places. And I could find other quillers.  There weren't many at the beginning of the net, but now there are so many more.
And the craft is really taking off in Russia, India, and Japan, just as it has always been around in places like the England, the Netherlands, and Australia (as far as I understand it.)  I'm so keen to see all the new ideas and techniques that come of this quilling renaissance.  Amazing pieces of work are being created all over the world. 
  
So I'm thinking seeing quilling on the cover of a catalog is a really good sign.  I think it shows the growing health of quilling as an art and a craft, as well as a new way to illustrate and design.  I hope to see more, and my eyes are always wide open and looking!

Thursday, August 13, 2015

Artist Interview: Serenity Wire Designs

Beautiful copper and peridot
pendant!
I'm very pleased to have the opportunity to post this interview with wire jewelry artisan SerenityWireDesigns!  Filled with wonderful swirls and curls, not to mention gemstones, each of these "tree of life" pendants is unique.  Keep reading to learn more about this artisan, their unique pieces, and where you can find them!

When did you get interested in wire art, and how did you learn?

"Well, I always admired wire art, but I never thought I'd be able to do it until a friend of mine started doing wire art. Sometimes I would give her a few suggestions here and there. She didn't take all of my suggestions. Some I really wanted her to do so I finally decided I should do my own. That way I don't need to wait for her to possibly do them or pressure her to make them. So I started doing my own! Once I decided I wanted to make my own pendants, I began doing my research. I'm more of a visual learner so I was looking up video tutorials on how to make them. I also observed my friend's pendants and many others on etsy. That was the most effective way I learned to make them, just by looking at the image of a wire item and figured out how they did it in my head."

What is your favorite project that you have made?

"It's kind of hard to say which one is one is my favorite. As I progress, I start liking my newer pendants more than the older ones. Not only that, but I like many for different reasons. But I guess if I had to choose, it would be my current one called "I'm not crazy." It's a tree of life pendant inspired by one of my favorite Disney movies, Alice in Wonderland, featuring the Cheshire cat."

What do you like best about wire art?

"I like that there's many ways to go about wire art. You can always do something detailed and complicated or nice and simple and still look great. You don't need to make something complex to make it stand out."

Where do you get your ideas for new projects?

"My ideas come from anything and everything.  Like many artists, I feel inspired from what I encounter. I'm a nature/animal and anime/manga lover so I try to incorporate that into my wire art a lot. I'm pretty obsessed with birds, though. I always have since I was little so I tend to make more bird-themed projects or at least try to."


A sampling of gorgeous wire and gemstone pendants in a variety of metals and styles.
The first is "I'm not crazy," mentioned in the text.  Note the wonderful spirals
used to make designs both serious and playful.

Do you have any special or long term goals for your wire art?

"A contest, or major project, or producing a certain number of type of pieces, or some such? I hope to continue doing wire art for the rest of my life. I definitely plan on doing contests and giveaways in the future but it is not set in stone yet as far as dates go. Most of my work is a 'one of a kind' and rarely reproduced. Therefore, I have been trying to start producing a few "made-to-order" items. I also hope to go to fairs and events to showcase or sell my work but that's farther into the future."

Is there one aspect or technique about wire art that you really want to learn?

"Not exactly. If I want to learn a specific technique I usually do my research right away and practice. Though quite frankly I try to not use other's techniques. I try to do my own unique techniques."

Where can people go to view/buy your art, and do you take commissions/do custom work?

"I have an etsy store where I have all of my wire jewelry and other wire artworks. You can go here if you're interested!: Serenity Wire Designs etsy shop.  I do take commissions/custom orders! I've had a couple of them in the past. If anyone wants something specific you can send me a message on my etsy or click the button that says 'Request Custom Order' You can also contact me in any of my other social platforms (dA, Tumblr, Twitter, Facebook, Instagram, and Pinterest)"

Many thanks to SerenityWireDesigns!

Image Credit: All images are of art belonging to SerenityWireDesigns - Pieces are Earth Kingdom, I'm Not Crazy, The Air Nomads, Little Peri, and The Darnassus Tabard

Saturday, August 8, 2015

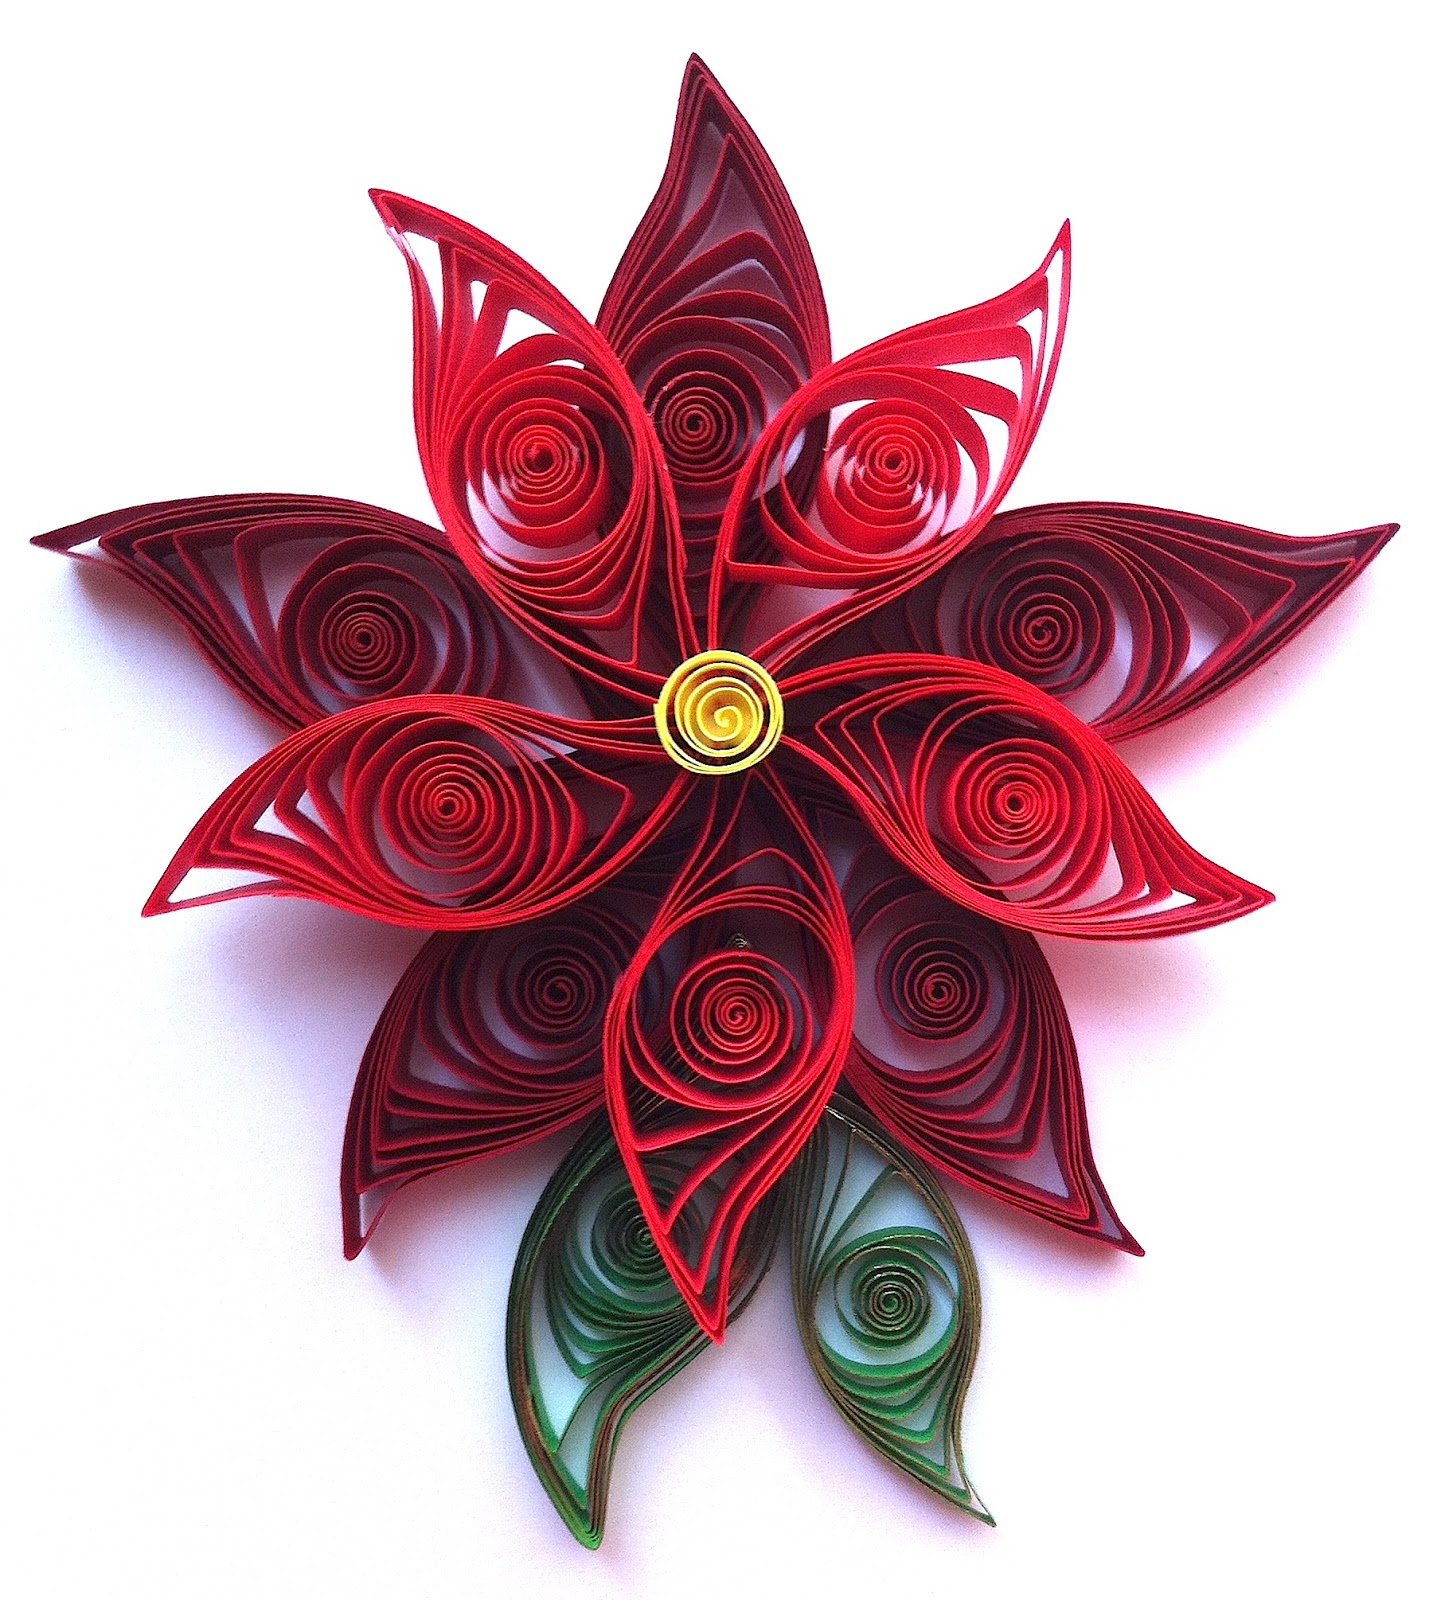
Quilled Poinsettia Flower Ornament

As I noted in my last post, there is a need for quilled Christmas tree ornaments for a "Quilled Ornament Charity Project."  Click the link for details about the project, and to see if you might be interested in participating!

I have decided to make two ornaments for the project.  The first is this quilled poinsettia flower ornament.  It is a simple design, but it looks really lovely now that it is all finished.  I thought I'd present a tutorial here of what I did, so anyone could make one.  Although I've done plenty of live presentations and workshops, this is the first written tutorial I've really done for quilling, so here it goes.

Here's what you'll need ...
  • Five full strips of dark red quilling paper, 1/4 of an inch wide.  
  • Five full strips of light red quilling paper, also 1/4 of an inch wide.  
  • One bright yellow strip, 4 inches long and 1/8 of an inch wide.  
  • One full strip of green with gold edging, 1/8 inch wide, and another half of a strip of the same color.
  • Glue, I use a good quality white craft glue.
  • Ideally, a clear acrylic spray to finish the ornament 
Roll the dark red strips and form them into 'leaf' shapes.  Glue the ends of the petals together to form a five-petaled flower, as shown.  Roll the light red strips and also make 'leaf' shapes.  Glue these together to form another five-petaled flower.

Now, you can see my light red flower is a bit smaller than the dark red flower.  This was intentional.  My dark red paper is very heavy, making a larger coil when it unwinds, and my light red paper is light, rolling tightly and not unwinding so much.  So even though the strips are the same length, the petals for the light red flower layer are somewhat smaller.  If you are dealing with paper that is the same weight for each color, you'll want to take some of the length off of your light red strips to achieve this effect.  I've placed a quarter in the image to give a sense of scale, both so you can see the difference in sizes a little better, and so you can see the size of the whole design.  It's more than four inches across at this point.

After the two 'flowers' have dried, stack the light red, smaller layer on top of the larger dark red layer and glue them together, staggering the petals.  You might have to be clever with small dabs of glue here and there to ensure the design is sturdy enough to hang from a tree, but doesn't look like it has glue all over it.

Then roll the bright yellow strip into a simple open circle quill and glue that to the center of the design.  This was where I'd originally intended to stop.  I added a silver jump ring at the top so it could dangle from the tree.  But then I took another look and decided the piece needed a but more 'oomph.'  So I chose to put a pair of leaves on it.  Roll the two green/gold gilded strips and make leaf shapes, as shown.  One will be smaller than the other, of course, because the strips are not the same length.  You might need to be careful about gluing them.  I had to add extra glue to the backs (the not-gold side) to make sure that they didn't 'spring out' like, well, springs, anytime the design was bumped or dropped.  (I put it through a few tests ...)

Then I glued them between the bottom petals of the flower, keeping them flat on the work surface.  They added just the extra interest and 'bling' I was looking for.  Then I coated the design with about three light coats of clear acrylic sealer.  I use Krylon Gloss UV protective clear coating for most of my quilling.  I like the way it tends to enhance the colors while adding a bit of a sheen.  Excellent in this case, athough I use the 'matte' finish rather than the 'gloss' in some situations.

Finished!  It's about five inches from top to bottom, and has a nice sturdy feel to it.  I hope it shows up well on a six foot tree, and has the durability to survive the whole auctioning process :)

Image Credit - My photos of my new poinsettia flower ornament!

Tuesday, August 4, 2015

Ideas and Inspiration for New Quilling Projects

This iron-on book, mostly for use
as a source for embroidery patterns,
is also a great source for quilling ideas.
So you want to quill, and you don't know where to start.  Or maybe you've been at it a while and want some ideas for, well, finding new ideas.  Here is my list of places I go for inspiration.  Starting simple and easy with "kits" and ending with some more strange stuff like "fractals."  Hopefully you'll find something useful here!  Let me know if any of this works for you, and what your own unique ideas are for inspiration and imagination :)  !

Note:  If you use someone's pattern, or create a piece that is reasonably similar to theirs, then you should contact/acknowledge them if you end up posting pictures of that piece, or putting it up for sale, etc.  Kits, for example, are offered with the understanding that you might craft and then sell a piece exactly like it.  Permission isn't necessary in those cases.  But some art is utterly unique, and one should not take a copyright for granted.  When in doubt, ask the artist.  At the least, it is a common courtesy, and at the most it could be a legal requirement, depending on the specifics of your situation.

Quilling Kits:  The easiest place to start is to simply buy a good quilling kit.  There are several companies that make them, and they are relatively inexpensive.  (Some are listed on my sidebar.)  A quilling kit contains instructions and enough paper to complete a specific project.  Some are very basic, and others quite involved.  You can do the kit exactly as is, make your own adjustments and embellishments, or use it as inspiration for a completely different piece.

Some patterns are easy to adapt, just
start filling in with quills!
Patterns in Books:  Books about quilling generally have patterns for you to follow.  Books are more expensive than a single kit, and usually do not come with paper, so be sure you know what you are getting before you buy.  Some are for beginners, others are for the more advanced and do not have tutorials.  Many books follow a theme like "cards" or "flowers" so be sure the theme resonates with you.  Books often have great galleries of finished projects at the back that are great places to find inspiration.


Images of Quilling:  Need ideas?  It's time to just go browsing.  I can spend hours looking through places like "tumblr" or "pinterest."  There are no patterns of course, or step by step directions.  But it is a great way to spot new techniques, ways to blend colors, and more.  The best part is that browsing is free, except for all the time I spend doing it, anyway :)

Motifs and Designs:  There are resources that are specifically created to offer copyright free motifs, designs, borders, illustrations, and patterns around a theme.  Many of the motifs are bought to be used as clipart, sewing patterns, tattoo sources, and more - say quilling!  I'll be posting here on the site about a few of the motif resources I have to give you a better idea what I mean ...

Some patterns are a bit more complicated ... but
perfect for more involved projects.
Other Arts and Crafts:  This is a biggie.  Other arts and crafts can be excellent sources of ideas.  Quilting, embroidery, origami, beadwork, and so much more all have their own kits and patterns.  One may be just what you are looking for to adapt for a new quilling design.  And if you are also practicing that other craft, you may find innovative ways to combine them into something extraordinary.  Quilling and sculpture, for example, are perfect partners for amazing paper art in three dimensions.  My personal favorite craft to keep an eye on is stained glass!  Gorgeous colors and clear designs are the hallmark of that craft, and they are often easily exported to quilling. But not to be overlooked are more unusual art sources, say fractal art.  A place like deviantArt.com has plenty of great pieces to spark your imagination.  Fractals already are a basic aspect of nature, so their repetition can fit in very well with quilled designs.

Nature:  The biggest biggie, really.  I can't draw very well, so I use my camera and take pictures of whatever I find compelling in the world.  Using my quiller's eye, I see things very differently than when I'm just randomly enjoying a simple walk.  Sometimes an image breaks down into a pattern hardly without trying, and other times its a struggle.  But like any artist, if you want to capture something amazing to share, sometimes there is no other way than the hard way!

What are your sources of inspiration for quilling?

Image Credits:  From the Butterfly Iron on Book by Barbara Christopher, sitting on my shelf.

Saturday, August 1, 2015

Quilled Earrings, Simple Enough to Actually Wear

I don't usually make jewelry out of paper, since it is so easily damaged by moisture or crushing.  Quilling takes so much time and effort, it seems like a waste to make something that will get bashed up.  But, I do make earrings if they are of a simple design, since then if they get munged up I can go right ahead and make a new pair without too much fuss.  This pair was strengthened by an extra border of paper around each petal, as well as a few good coats of clear acrylic spray over the whole design.

Do you make paper quilled jewelry?  What are your tips for strengthening it and keeping it looking good for as long as possible?

Image Credit:  My earrings, my picture, my pattern.

Paper Spiral, The Blog

Ah, the very first post has to highlight my favorite little butterfly.  She now finds herself in the banner for this blog, and she is extremely surprised about that.  The butterfly is in fact about 2.5 inches long, and has a three dimensional quality, with the wings up off the surface.  The pattern goes all the way back to 1977, from Artistry in Wood.  I have a lot of these older patterns, "ancient" books, and more, since I've been doing paper quilling since I was nine years old.  And it's been a while.

Here on this blog I hope to share lots of thoughts, history, ideas, patterns and more, for all sorts of crafts.  I love paper quilling and making jewelry, but I also make silk flower arrangements, do embroidery, create greeting cards, and, well, anything else that strikes my fancy.  Especially if it includes glitter.  I love comments, so please share your own ideas and thoughts there!

This butterfly was originally intended to be one of a trio, but the others have yet to be created.  And it's been about, oh, twenty years that this lil' lady has been around by herself.  So we'll see about that ...

Image Credit:  My butterfly, my picture.  Pattern: Artistry in Wood, 1977.